
Tuesday, June 30, 2009
renovation :: part 2
since posting about our floor renovations, i've had some questions as to how exactly i painted the floor. i'm going to lay out as best i can the steps i took. keep in mind, i'm not a professional and there may be better ways. this is just how i did it.

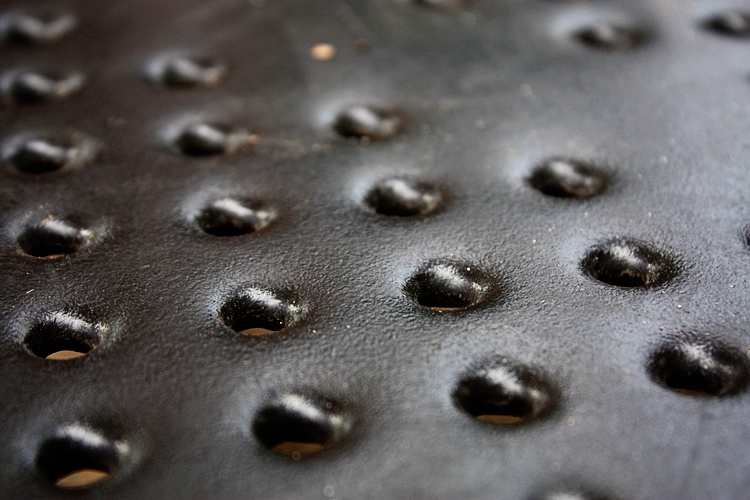
above is a photo of the pattern i cut out of foam core (which i'll talk about it more detail below). i think it's beautiful just on it's own. unfortunately it doesn't exist anymore which is why i took the photo. as i got to the edges of the room i had to keep cutting it down until there was nothing left. sad, sad, story.
how to: (prepping the floor)
- start with a freshly sanded or smooth floor. when the refinishers sanded the maple floors, we had them do this room as well so i had a fresh palette to work with.
- i applied a single coat of primer to the floor to start. it wasn't a very thick coat, you could still see the grain of the wood through it.
- i applied 3 coats of the base coat color. i used glossy finish porch paint because i wanted it to be easily cleanable since it's a high traffic area. (fyi, home depot is discontinuing this paint and is only going to be offering matte finish....bummer.)
how to: (creating the stencil)
- to create the stencil, i found a pattern i liked. i then recreated the pattern in illustrator and made adjustments. (ie. i made the center flower larger, took out some small line details, spaced the flowers out more etc.) if you don't have a program like illustrator, you could do this with graph paper, or something similar to ensure your pattern is perfectly symmetrical etc. (or you could ask a good friend that has access to such a program) ;)
- i scaled the pattern to the exact size i wanted it to be on our floor. make sure you have something in your design that you can use to line them up to create the pattern on your floor. for me, i could line up the dots from the previous flower to know exactly where the next one went.
- i then printed it out at full size. (most programs offer the tiling function so it will print the design on multiple pieces of paper that you can then tape together)
- i purchased the largest size of foam core from hobby lobby and taped the printout to it.
- using an hobby knife, i carefully cut out the pattern. this is not easy, especially with a rounded design such as mine was. it would be much more simple with a straight-lined design. i chose foam core since it was a big project and i wanted something that would hold up to multiple uses. i was afraid matte board or the like would end up getting soggy.
how to: (painting with your stencil)
- i measured my room to find the exact center and started there. depending on your design, this may or may not be the way you want to do it. for me, i wanted the design to run off the edges of the room from left to right, but then end short front to back, so this step was important.
- using a small artist brush i started painting in the stencil. again, i used glossy porch paint in white. for mine, it would definitely take 2 coats to get a solid color, however, we stopped at 1 because it was the look we were going for.
- after each flower, i would line the stencil up to determine where the next one went. having a floor with lines also helped ensure that i kept my stencil straight. if you did this without something that was lined, you might need to lay down a starting line to make sure your first one is straight. after that, if you line everything up they should continue being straight.
that's basically it! one tip i would suggest: if you use foam core, coat the cut edges with a couple coats of paint. i found that once it got coated with paint, it smoothed out and took care of any little imperfections there were in my cutting.
i hope that answers everything. if not, feel free to leave a comment. i'm happy to answer any questions! if you paint something, be sure to send me a link to some photos! i'd love to see!
Monday, June 29, 2009
renovation :: part 1
not long ago i mentioned that i needed some help with some flooring ideas. well, the project is now complete! we've been ripping out carpet and other random floor coverings for the last couple months. last monday the floor guys came out to start work on the refinishing of our wood floors. here are some before and after shots!
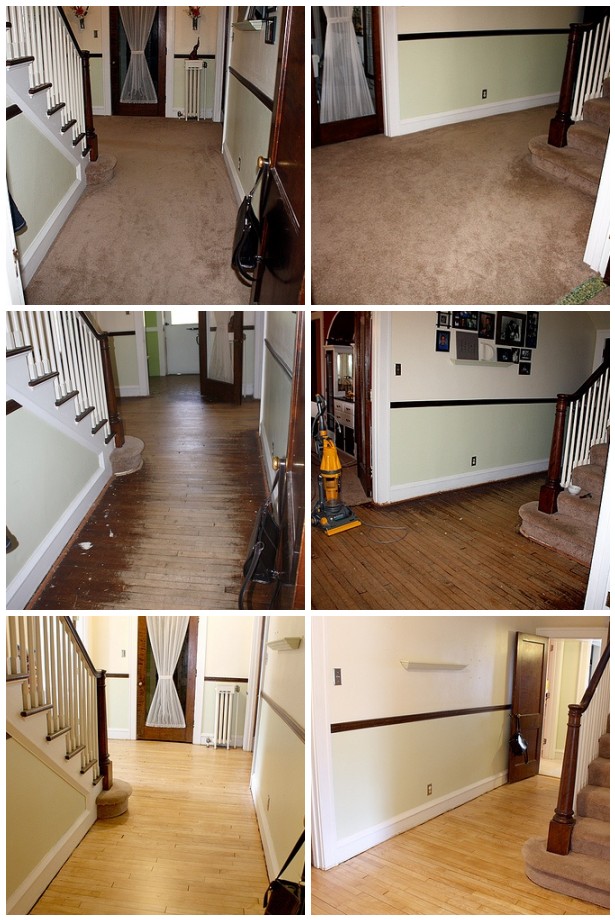
this is our front entry with the staircase leading to our second floor. the top two are the before pictures with the carpet still intact. the second two are what the maple floors looked like under the carpet, and the last two are what they looked like after being refinished.

here are the same photos for our living room. please pardon the messy before photos. we were trying to get ready to rip out the carpet and stuff was everywhere! i only have one (viewable) photo of what the wood floors looked like under the carpet. then, the final product. it's so amazing what a huge floor sander and a little poly can do! i can't wait to move our stuff back in! (which will be happening slowly over the next couple weeks. i want to do a little rearranging, decorating since the rooms are all empty.)
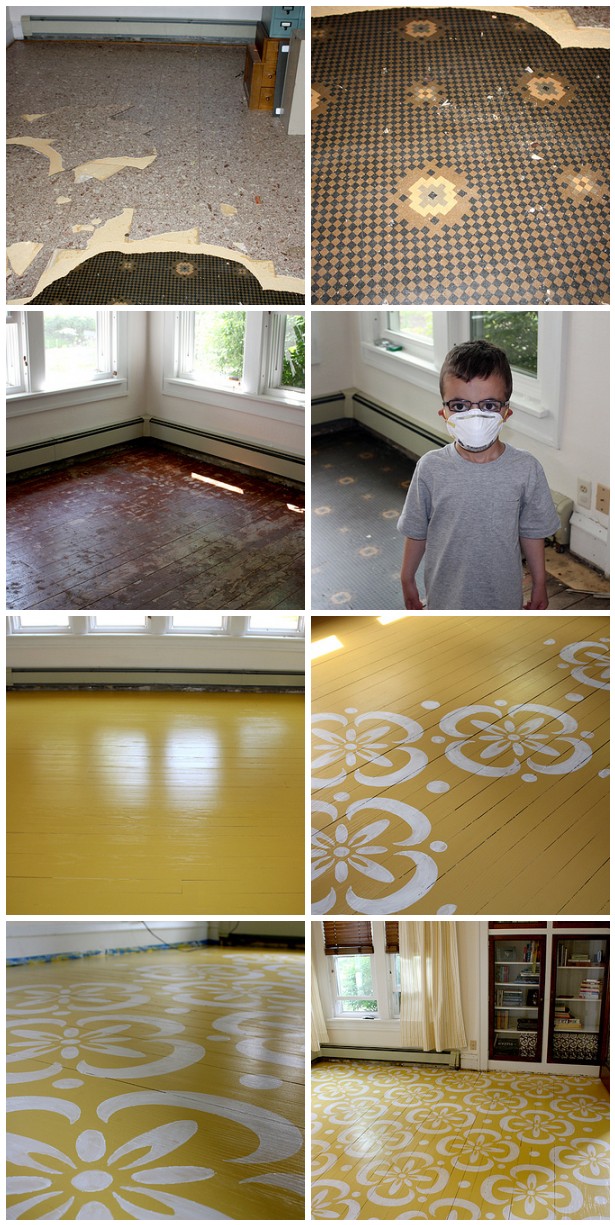
and here's the room i was asking for help with. it's our sunroom. because it only had soft wood, and not maple like the other areas, i thought it would be the perfect opportunity to try some paint! i had always wanted to paint a wood floor, and here was my chance. i posted a pattern i liked here. while i really liked the pattern, there was just something i wasn't sold on. i couldn't put my finger on it. then, one day while searching flickr for some more painted wood floor inspiration, i came across a photo which had rough old worn wood floors with HUGE patterns spread out over it. we're talking like 4 feet in diameter each! there was my answer. while our room isn't big enough to support 4 foot designs, i blew the pattern up to about 24" in diameter each. i laid it all out in illustrator to see how it looked and the floor was born! it took me the weekend to do the pattern, but we're both really happy with it. we chose to only do one coat on the white so that it was a little more "rustic" (for lack of a better word). we're going to leave it unfinished for awhile so it can get some good old wear and tear on the patterns and then when it's worn to a point we like, we're going to seal it. i should mention that including the felt paper that had to be scraped off the floor, there were 5 layers of flooring in this sunroom! oy!
now that we're done with that we're going to be moving onto the other side of our first floor which includes the dining room (soon to be family room), kitchen, and back hallway. exciting times!
Sunday, June 28, 2009

Saturday, June 27, 2009

Friday, June 26, 2009

Thursday, June 25, 2009

Wednesday, June 24, 2009
threece

the little dude is a picky eater. it never used to be that way, but when he turned 4 he suddenly decided he didn't like to eat anything. we've resorted to the whole "take 5 more bites and then you're done" bit. i hate it, but until we find a better solution, that's what we're doing. so the other night, he's taking his "bites" and he counts them as he goes.
"that was my first bite"
"that was my second bite"
"that was my threece bite" (pronounced like the name "reece")
we can hardly control our laughter, but don't want to laugh when he's not eating well. it's so cute when kids start to try and understand the english language. nothing about english makes much sense. i think "threece" is a way better option than "third" anyway.
Tuesday, June 23, 2009

Monday, June 22, 2009

Sunday, June 21, 2009
an ode to grandpa porky
on what is supposed to be a day to celebrate fathers and fatherhood, my grandpa porky passed away. you may think that's an odd (or even mean) name to call your grandpa, but to us, his grandchildren, that will be how we remember him forever. while our grandpa on our father's side was a large man, this name did not come from his stature. instead, it came from his beloved bulldog who we grew up with. the bulldog's name was, of course, porky. thus, the nickname grandpa porky. the connection might not make a ton of sense as an adult, but to us kids, it made perfect sense.
there are many things i will remember about my grandpa. here are the top 10:
- popsicles. lots and lots of popsicles. he always had an abundant supply and in order to get one we'd have to hop up on his lap and give him a big hug and a kiss. my cousins and i would sit out on the porch and have contests to see who could get the tip of their popsicle the pointiest.
- shocking his bald head. as kids, we would rub our feet on the carpeted floor and then stick our charged fingers upon his bald head. we thought this was the funniest thing in the entire world.
- his chair. grandpa spent many, many hours sitting in his recliner. if you happened to sneak into it while he was out of the room, you knew darned well that as soon as he was back, you were going to be moving your little tush out of that chair.
- the people's court. grandpa loved watching the people's court and letting the people on there know just how stupid he thought they were.
- coloring. i spent so many hour on that living room floor coloring in books and then taking the finished product over to him for his critique.
- he HATED hungry, hungry, hippo. we happened to love playing that game at his house because it was one we didn't have at home. he would get so mad every time we brought that game out. many times we were ordered to the porch to play the game outside because it was so loud.
- speaking of loud....grandpa's t.v. was always turned up to the max. grandpa was definitely a little hard of hearing to say the least.
- his stubbornness....enough said.
- his overalls. my grandpa was a farmer all of his life. unless he was at church, he was in blue and white (conductor-like) overalls. always.
- how much he loved his grandchildren & great-grandchildren. he had many more than the average person. so many that i can't give you a number because i can't even keep track anymore! of course, my two boys landed in the great-grandchildren category. while they are both still very young, i'm glad to know that they at least got to meet my grandpa porky. they were even lucky enough to see him the day before he passed while staying with my parents who were watching them when the hubby and i were at a wedding.
grandpa porky, you will be missed by your 6 children, many, many, grandchildren, and many more great-grandchildren. you will be remembered always.


Friday, June 19, 2009

Thursday, June 18, 2009

Wednesday, June 17, 2009

piggly wiggly

in the midwest, we have a grocery store chain called piggly wiggly. it's what i grew up with and we happen to have a few of them in our small town. we had to run there today to grab a few things for dinner. as we drove up, the baby pointed to the "pig" logo on the store and said "mickey mouse". first of all, i'm not even really sure how he knows mickey mouse, but whatever. i corrected him and said "no, that's piggly wiggly" to which he replied, "lig-ur-ly". we've had him saying it all afternoon and evening. it's just the cutest thing. i'll have to catch it on video so you can get the full effect. turns out piggly wiggly is tough for little guys to say when just learning how to talk. when the little dude was a baby. he would call it "piggy wiggy".
Tuesday, June 16, 2009


Monday, June 15, 2009
Subscribe to:
Posts (Atom)