Showing posts with label crafts. Show all posts

Friday, June 18, 2010

family friday :: pom-pon garland

6_friday

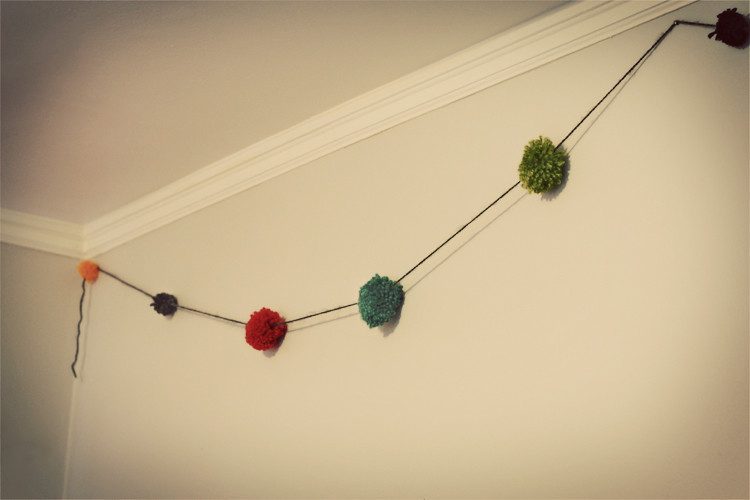
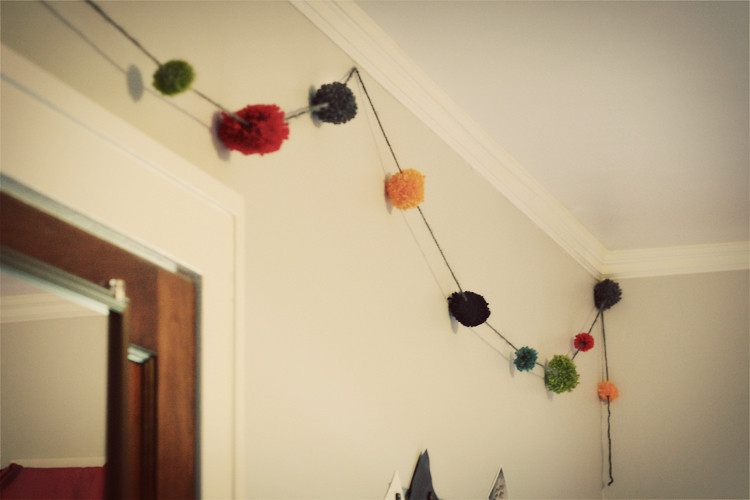
if you follow me on twitter or facebook, you may remember me talking about teaching my little dude how to make yarn pom-pons. he literally spent 4 straight hours making them once i taught him how. a project i thought i was going to be doing myself was almost entirely finished by my 5 year old!

pom pon garland

here's what i ended up doing with all the pom-pons he made. we made 3 different sized pom-pons in 6 different colors. when they were done i strung them on yarn.

pom pon garland

once they were all strung, i hung them up with small nails around 2 walls in the boys' new shared room. i have a few more left that i want to hang from their new (used) bunk beds. once the bunks are spruced up, i'll share some photos of the entire room.

Friday, June 11, 2010

before & after :: planner

13_tutorial

i hear the question "how did you think of that?" a lot. or, "if i only had your eye for things."

i think sometimes people get too caught up in what something looks like now instead of looking at things for what they can be. so many times, the things i get the most compliments on, are the things i pick up at a garage sale for next to nothing and transform. i think it's mostly because i'm someone who's good at seeing the potential in something. i'm good at ignoring the horrible paint job or the tiny hole that could be repaired and instead look at the "bones" of the item. does it have good form? is it well made? would it look better just by changing the color? these things are so easy to change and can make such a huge difference.

i've shown you a few of my more involved transformations, but i thought i'd start to share with you some of the really quick and simple things you can do to everyday items to make them fit your needs. (without taking a lot of time or breaking the bank!)

for example, the other day i had to head to the office supply store to get a new small planner for my purse. as i looked through the stacks and stacks of horribly designed planners i started to get frustrated. it seemed that if the cover was nice, the inside was horrid. if the inside looked nice, the cover was awful. i settled for the one where i liked the inside the best since that's the part you can't really change. i decided i would alter the covers when i got home.

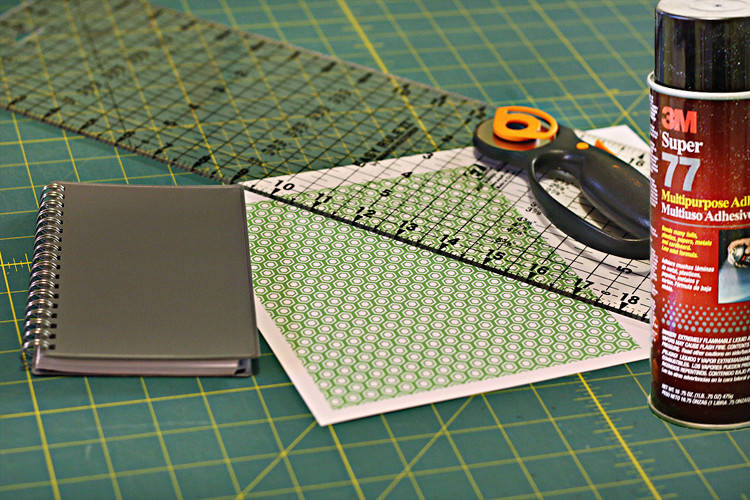
here are the supplies i used:

transforming a planner

  1. my simple planner on the left with the plain grey cover.
  2. a ruler
  3. a rotary cutter (or scissors, xacto knife)
  4. super 77 (i highly recommend this spray glue. other glue may work, but this glue is sure to hold!)
  5. whatever you want to cover your object with. don't get hung up on this part. i printed out a pattern i designed but if you don't have the ability to do that, think outside the box. use a page from a magazine, book, fabric, etc. there are a million places online to download other people's designs, often for free! (please make sure you have the right to download other's deigns. just because it's on the internet doesn't mean everyone has the rights to it!)
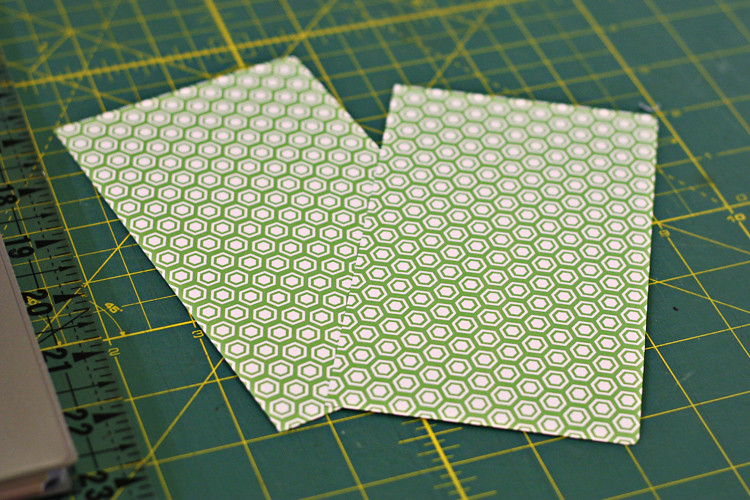
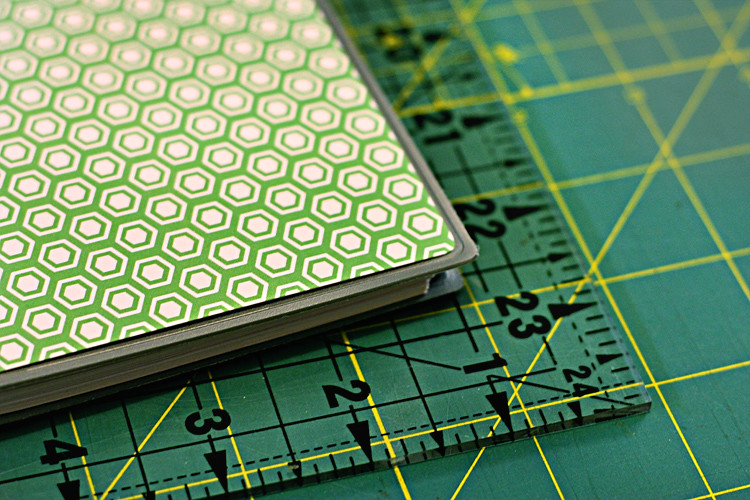
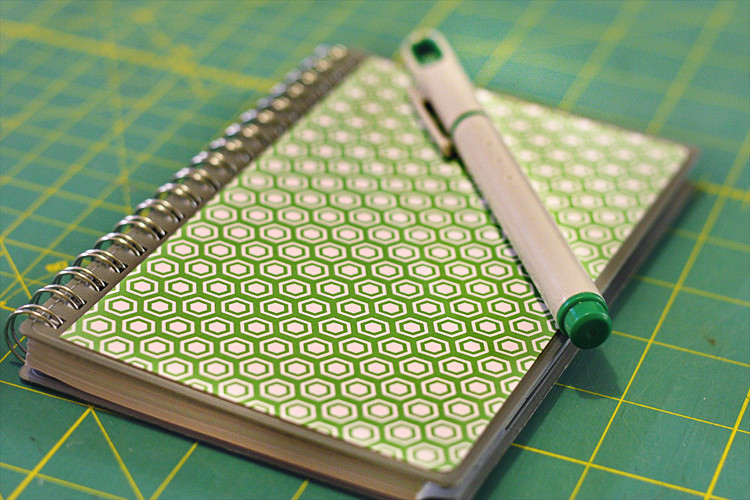
transforming a planner start by measuring the cover of your book and cut your paper to the size required. i made mine a little smaller than the cover itself transforming a planner i also quickly rounded the corners of my paper with a scissors to match the cover. transforming a planner once your covering is cut to size, simply spray with the spray glue and press to adhere. voila! you're done!

the whole project probably took 15 minute to complete and that includes taking photos along the way. super simple, quick, and easy! and now instead of a plain vinyl cover, i have a customized planner that's sure to get comments when i whip it out of my purse.

Wednesday, January 13, 2010

homemade :: holiday gifts

first of all i need to apologize for the blurry first photo. i forgot to take final photos of this gift until after i gave them. i had to take photos in the evening at my mom's house.....

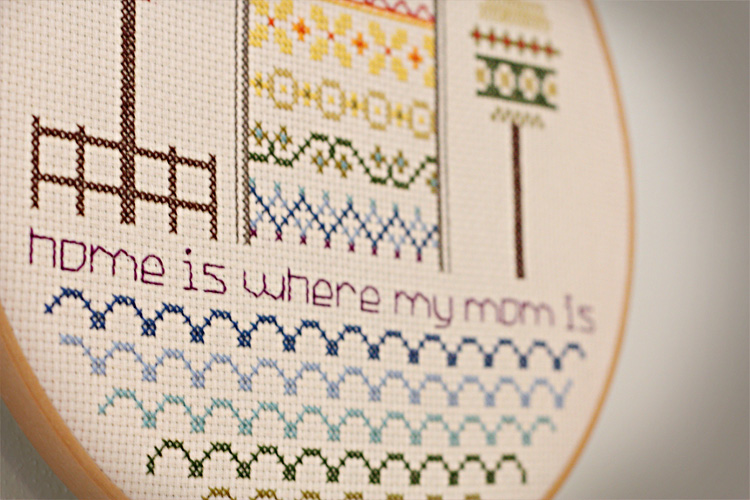
my first cross stitch design

this was my first official cross stitch design that i've ever done from scratch. i've done small cross stitch projects in the past from patterns, but had never designed one myself.

my first cross stitch design

it all started when i saw the quote: "home is where my mom is" somewhere on the interweb. i knew i wanted to do something with it, and finally decided on cross stitch. i made one for both my mom and my mother-in-law.

my first cross stitch design

i was surprisingly able to create these with mostly thrifted materials. the hoops were all thrifted, some of the thread, and even the aida cloth. i bought maybe 2 or 3 skeens of thread retail.

my first cross stitch design

Saturday, June 13, 2009

send me some inspiration

othernews

painted floor pattern

i need help.....fast! we've torn out all the carpet in the first level of our house. we have nice maple hardwood floors in the livingroom and entryway/foyer areas. in the sunroom and the dining room (soon to be family room) we have a soft wood. probably something like fir. when they guys come to refinish the maple floors, they're also going to be sanding the soft wood floors for us as well. i'm hoping to paint both the sunroom and dining room since the wood isn't the greatest quality. the problem? they're coming in a week and i don't have a plan yet! i'm not sure if i want to go solid or patterned, one of each, both......i don't know! i've done a quick online search and didn't come across anything too inspiring except for the image above. i really love this pattern and think it would be great in our sunroom. i'm thinking yellow for the background and white for the pattern. anyone have any great ideas, patterns, etc? i'm open to hearing all of your ideas! even if you think they're crazy! i'm pretty crazy when it comes to stuff like this and don't mind doing project that are detailed. if i go solid color, any suggestions on a good color? both of these rooms are not decorated yet, so i'm pretty open. i'd like to eventually paint the new dining room turned family room walls a light blue grey. other than that, i'm open!

*image from ohdeedoh

Saturday, February 14, 2009

february 14, 2009 - photo of the day


(a heart made by the little dude at pre-school. every other parent came out with pink, red, or purple hearts. mine....blue. love it!)

happy valentine's day!


the sweetest valentine written entirely by the little dude. i've never seen him write so much at one time. the best gift ever! i'm so lucky to have 3 valentines.

eta: i'm not sure why the photo looks like such crap at this size. if you click on it to get a larger version it looks a little better. still not great. ugh.

Thursday, December 11, 2008

a story of gingerbread in photos

holiday workshop day at the john michael kohler arts center preschool.


Monday, November 10, 2008

feathered headband

the hubby and i had a fancy-schmancy grown-up party to attend this weekend. it was our first real grown-up gala and i wanted something a little special to go with my outfit. i had been admiring a lot of feathered headbands that i saw popping up, but wasn't sure i could pull one off myself. i searched etsy and found a bunch i liked, but was afraid they might not arrive in time or that i'd spend the money and chicken-out and not wear it. being the craftster that i am, i figured i could make my own. a quick trip to the craft store and i had my feathers in hand. here are a few pics of how it turned out:


my favorite parts are the little green accents on the tips of a few feathers.


here's a close-up of it when i actually had it on for the party! that's right, i was brave and not only wore it, but felt very pretty while doing so!

Wednesday, October 15, 2008

desk progress

slowly but surely i've been making progress on my desk project. after looking into my different options of paper vs. vinyl, i decided to go ahead with paper because it was quite a bit cheaper. to give you a rough idea of cost, i paid somewhere around $80 for a 34 inch x 14 foot printout of my selected pattern. i contacted a couple places in town that did large format printing and the people i ended up going with were great. here are some preliminary pictures of what it looks like:


what i ended up doing was basically decoupaging the paper onto the desk. it was definitely a 2 person job. once the glue was spread on the desk, i needed someone to hold the paper up so that i could gently smooth it onto the surface a little at a time. since the paper was very thin, it's not perfect. there are a few wrinkles here and there, but nothing i can't live with. also, the corners were rounded so it made finishing them a little difficult. since the desk is an "L" shape, there wasn't really any way for me to match up the patterns at the seams. at first this really bothered me, but i've since let it go. overall, i'm happy with it and it will do until i'm rich and famous and can afford a really nice desk. ;) these photos are from right after we set it up. i hadn't put anything back on it because i wanted to be able to show the whole surface in the photos first. i can't wait to "decorate" my desk now. i've already purchased a few things from ikea. i'll post more photos when that phase is complete.


those darned-tricky corners.


and a close-up of the pattern.

Tuesday, October 07, 2008

how to preserve your child's artwork

the little dude created a piece of artwork in pre-school last year that i really loved. it's green and orange which happen to match the colors of our kitchen. the photos don't do it justice. i wanted to preserve this piece of artwork to display it over our eating bar area. i thought i'd share with you how we did it in case you'd like to do the same! please note that this can be done with any artwork and is a great alternative to framing.


here's the piece of artwork in question. as you can see it was done on really thin paper. being that it was a watercolor type painting, it was very wrinkly. the one thing to keep in mind is that with thin paper like this, it will most likely get very wrinkly when applied to the canvas. if you're not ok with this, then this might not be the right solution for your piece of art. the nicer or thicker the paper, the less chance of wrinkling.


i started out by buying a canvas that would fit the particular painting. there wasn't a perfect size, but this one came pretty close. we only had to trim a small bit off the top of the artwork. (which was fine by me because his teachers wrote his name on the front of the painting! tsk, tsk!) i also bought mod podge (other glues/sealers will work as well), a small roller and tray. then we're ready to start.


here's the little dude rolling on the glue with his mini roller. you want to make sure you have a good thick layer of glue so it sticks well. once you have it covered in glue, lay the artwork down and press firmly. try to press out any wrinkles or puckers to the best of your ability.


we then flipped it over (lining the island with parchment paper (or waxed paper would be fine) first so that it wouldn't stick to the island) we loaded it up with magazines to ensure solid pressure. we left it like this overnight to make sure it was really dry.


once it was thoroughly dry, we removed the magazines. next, we glued the sides and the back and wrapped the artwork around the canvas. (note: you don't have to do this. you could trim the artwork to the exact size of the canvas if you wish. you could also paint the sides a coordinating color....i would do this first however.)


when wrapping the paper around the canvas i folded the corners as if i was wrapping a present. we then flipped it over onto the parchment paper again so that the back was now facing down. this ensured that the artwork would not pull away from the back. again, we left it to dry overnight.


when completely dry, we hung it up over the bar. voila!

Tuesday, September 23, 2008

birthday card

i woke up this morning to a lovely card from my oldest.


the outside of the card features a birthday cake. (see the circles) the green crazy part in the middle is pudding! mmmmm!


this is the inside of the card. it may need a little explanation! it says "birthday". he wasn't happy with the "y" that looks like a "t", so he re-drew another one below it. then his name is below that. he started with "fin" but then ran out of room for the rest. so the "ley" are a little out of order before the "fin". he worked so hard on it and it melts my heart.

the boys also sang happy birthday to me while i ate breakfast. even the baby tried to join in! too cute!

Wednesday, September 17, 2008

renegade craft fair - chicago

i'm a little behind on posting about this, but better late than never, right?

the hubby and i took a trip down to chicago for the weekend....without the boys! it served as our anniversary get-away, but my main objective was going to the renegade craft fair. i had never been there before, but had heard many, many, many amazing things about it and had always wanted to go. unfortunately for us, the weather was not being very cooperative. over the 2 days we were there, chicago reportedly got 9" of rain. yeah. fun. i treked through booth after booth in the rain. many people's goods were just soaked with water. so sad. and nobody had power. this was not only unfortunate for them, but unfortunate for people like myself who couldn't see anything past 7:30 at night. i missed approximately the last 1/4 of the booths because it was just too dark to see anything. i tried to collect as many business cards as i could of those last booths so that i could visit them online to make up for it.

i had been saving up my money for a long time in anticipation of going to the fair. here are the goodies i managed to snag before it got too dark. please go easy on the photos as i'm obviously just learning with the new camera!


my first purchase are these adorable little earrings from sprout jewelry. i needed a pair of everyday-go-with-every-outfit kind of earrings. these fit the bill perfectly.....and at only $15, they hardly cut into my budget!


here's an adorable print i picked up from kitschy hippo. i just love the girl's dress and couldn't pass her up. i also love how the door has a little sign that says: "whiskey"!


i am completely in love with this next print. actually i was in love with pretty much every piece of art that johanna wright had at the show. it was so hard to pick just one. johanna also has a children's book coming out this spring entitled "the secret circus" that we're definitely going to be getting for the boys. i cannot wait to see all the artwork in it!


of course i had to pick up something for the boys while we were there. unfortunately i cannot find the business card for this adorable, precious, cuter-than-pie tie that we picked up. the gals were from minneapolis and super nice. we chatted with them for awhile and i'm super sad that i can't find their information to post. if anyone knows who's work this is, please let me know! i was super tempted to get 2 ties - one for each boy - but in the end, chose only one for them to share.


and the créme de la créme of my purchases.....an absolutely beautifully crafted purse from amber jensen, owner of sketchbook. it turns out i bought her favorite. she said it was going to be hers if nobody had purchased it at the fair. luckily it came home with me! i just love the whole grey/yellow combo that's been so popular lately. it was by far my most expensive purchase and i fought with myself over whether or not to buy it, but in the end i'm so glad i did!
Monday, September 15, 2008

the desk project : part 2

ok, so now that i know what i'm going to do with the desk, i need some opinions on colors/patterns. here are 6 color and pattern size options i put together. we can mix the colors and pattern sizes. so which do you like the best? leave your opinions in the comments.....for example: "i like pattern X with color X" so that i know what numbers go with what. i can't decide if i want teeny-tiny delicate patterns or large, oversized patterns. i honestly think it will look cool either way, but would love to hear what you think!

please click on the image for biggie-bigness!

p.s. the patterns and desk are to scale.

Blog Widget by LinkWithin