Showing posts with label around the house. Show all posts

Thursday, July 01, 2010

in other news :: home made laundry detergent recipe

othernews

if you follow me on facebook or twitter, you may have heard me mention that i was going to attempt to make my own laundry detergent. i was shocked at the responses i got to my posts! everyone wanted to see how it turned out and try it themselves. i did two loads yesterday and things seemed to come out a.o.k. i didn't notice any residue or anything crazy on my clothes and they came out smelling clean. so, here's the recipe for the detergent i made:
laundry

this recipe makes a total of 10 gallons of liquid detergent (although, you only need a 5 gallon bucket, you'll see why later)

5 gallon bucket with cover (we got ours at home depot for about $3.00)
4 cups hot tap water
1 fels-naptha bar of soap
1 cup super washing soda (by arm & hammer)
1/2 cup borax

grate the bar of soap into the 4 cups of hot tap water over medium-low heat until it's completely dissolved. (this bar of soap is much harder than i expected. grating it took some time and a lot of muscle. next time i might chop into small chunks with a kitchen knife and then put in the food processor)

next, fill your 5 gallon bucket 1/2 full with hot tap water. pour melted soap & water mixture into bucket along with the washing soda and borax. stir until all powder is completely dissolved. finish by filling bucket to the top with more hot tap water. stir again, cover, and let sit overnight to cool.

once cooled, mix thoroughly and pour into a used laundry soap dispenser until 1/2 full. fill the remainder of the dispenser with water. shake to mix thoroughly. you will need to shake dispenser before each use as the detergent gels.

i didn't use any this time, but if you'd like you can add essential oils to make your detergent smell prettier. use approx. 20-30 drops per 5 gallon bucket.

for front loading washers use 1/4 cup per load
for top loading washers use 5/8 cup per load

as for price, this 10 gallon supply cost us approximately $5-$6 dollars. (that's including the bucket!!!) the fels bar cost approx $2. the borax was about $4. the washing soda cost about $3. the borax and washing soda came in big boxes and we only use between 1/2 and 1 cup for 10 gallons. we'll have enough of those two for about 10 more mixes! so the only thing we need to buy next time is the fels bar.

one thing to note, we had a really hard time finding the super washing soda. i would recommend calling around before you run out to get some. we tried 4 stores before coming home and calling around. so far we only found 2 places locally that carry it. you can always order it online, but it obviously increases the cost quite a bit because of shipping charges. even so, the box will last quite a long time and overall, not add a ton of cost to the mix.

i also found a recipe for fabric softener which i'll try as soon as my current sheets run out! i'll be sure to share if it works well.

Thursday, April 22, 2010

thrifted :: mid-century modern chair

5_thursday

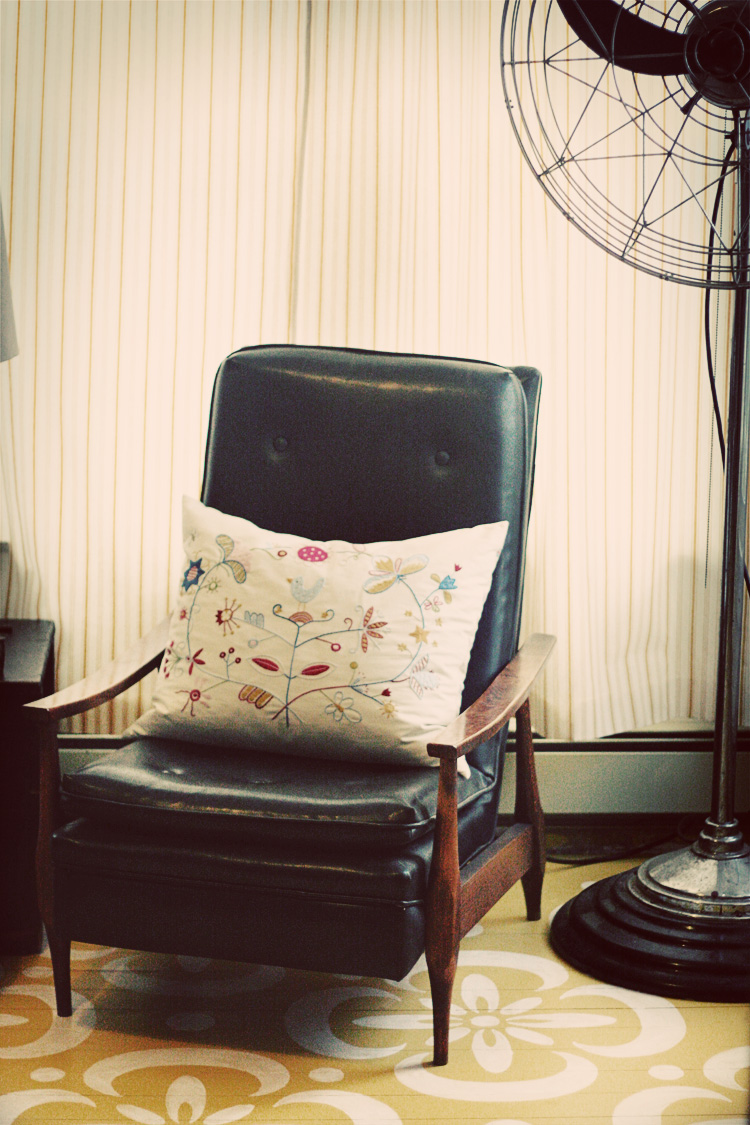
got this fabulous mid-century modern chair at an estate sale this past weekend. it was at an amazingly cute little mid-century home (which was also for sale) and packed to the brim with authentic mid-century pieces. i heard it through the grapevine that the owner actually owned a furniture store downtown back in the day so every piece of furniture in their house was pristine and very well made. we went on saturday when everything was full price. there was a sofa and 2 side chairs (none of them part of a set, but all matching style). we wanted all of them but decided to take a chance and come back first thing in the morning when everything was 1/2 price. BIG MISTAKE! the couch and chair that i had fallen in love with were both sold. however, this chair, the one that the hubby liked, was still there. so, we picked it up for $47.50 ($95 the day before). it's in near-perfect condition. it's only missing a couple of the tufting buttons which can easily be replaced. it also has a little surprise of being a recliner! a little foot rest kicks out from underneath. the foot rest is quite tiny for the hubby, but would be good for me. right now it's calling our sunroom home. we hope that when we find a sofa and another side chair it will be part of our living room set.

mid-century chair

Saturday, January 09, 2010

bonus post :: a thrifted christmas

thrifty christmas

way back when the weather was warm in wisconsin i spent every friday morning thrifting around town. it was my “me” time....no kids, no work, just me and lots of cheap vintage goodies! it really became a way of life for me and my family. i decided early on in my thrifting adventure that i was going to try and do a totally thrifted christmas for my boys. (ages 5 and 2) they’re still young enough to not care that they’re getting “used” toys and since they outgrow them so fast it just made sense. the boys did occasionally come along with me on my adventures and so i prepared them for their thrifty christmas every time they asked for something at a sale. i’d say, “well, we’ll need to go home and write santa a list of all the things you see at these sales and then maybe he can get them for you for christmas.” and we did just that.

thrifty christmas

the big gifts of the year were two school desks that the boys happened to be with me when i found. the little dude begged for them. he sat in one and wouldn’t get out. they were an amazing steal at $5 each! yes, $5. they needed a little cleaning since the tops were covered with stickers, but otherwise in great vintage condition. i secretly let the man who was running the sale know that i wanted them and would be back. meanwhile i told the little dude that he needed to add it to his list for santa while he begged all the way to the car.

i spent the summer collecting other gifts and was so excited about christmas. i had found so many goodies. that is, until i started wrapping the gifts. i started second guessing what i had done. would the boys like all these gifts? would they care that they were from garage sales? what had i done to my boys? was i scarring them for life?

that feeling promptly left on christmas morning when they saw their desks and opened all their gifts with wide eyes and smiles. it didn’t matter what they got or where it was from. in fact, i think it made it more magical to them that santa actually read their letter and managed to get all these things that they had seen and written about. how in the world did he do that?

thrifty christmas

thrifty christmas

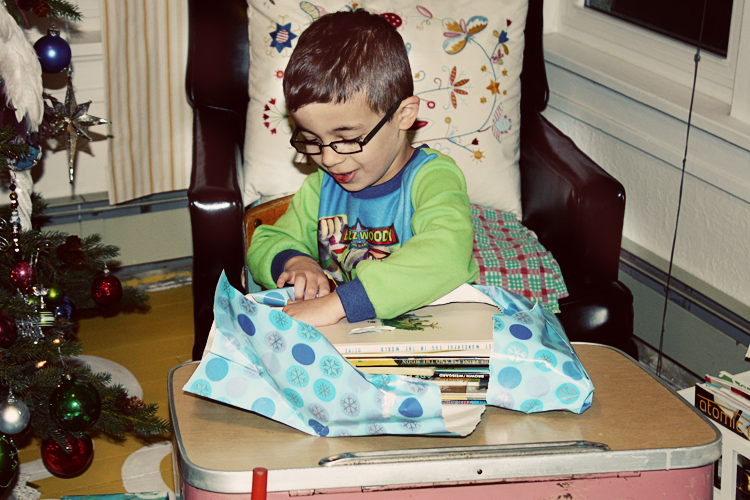
here are both the boys sitting in their desks opening the rest of their gifts (which they insisted on). you can see the huge stack of thrifted books they both got and the excitement in their faces. i think they each got approximately 15-20 books. something that would have cost a fortune if purchased new. i’m very particular when buying used books. they either have to be really cool with vintage artwork or new and high quality. i like to dig through to find things like caldecott winners etc. things that aren’t just garbage.

thrifty christmas

here you can see some of the other gifts....a little computer, a basketball game (where you try to shoot the ball from a lever and beat your opponent), a school bus (that is fought over often). these are just a few of the other things they received, there was much more yet to be opened. all in all i’d guess i spent less than $30. for EVERYTHING! their ENTIRE christmas. they got way more gifts than they normally would have if we had bought them new and enjoyed it just as much. in fact, my hubby expressed how he thought i bought too much on several occasions. it’s just too much fun when everything costs 25 cents or $1.00!

oh, and the best part of being thrifty? the toys are already out of their original packaging! that’s super great for 2 reasons. #1. less garbage to throw in the landfill, #2. spending our christmas morning playing instead of trying to get things out of all the overdone packaging these days!

will we do a thrifty christmas again? absolutely! will our kids know the difference or care? not for one second!

Tuesday, November 17, 2009

the reveal :: my studio

othernews

the time has finally come! i know many of you have been waiting to see my studio/office for many, many weeks now. i finally got around to taking some photos today. so here you go!

basement_before

this is what the main studio/office area looked like when we moved in. not pretty. when we moved in we painted and put carpet down but other than that i hadn't really done anything at all. it was always one of those things on my list that kept getting pushed to the back burner. i scheduled my first open house last weekend in order to force myself to finally do something with the space. here are the results.

sign

my grandpa helped me cut out the marzipan inc. sign in the background for the national stationery show. what you can't see here is that each piece is glittered on the front side to add a little sparkle. the big island in the middle of the room is one of our main work areas. it's where we pull all the inventory together to pack orders up, as well as many, many other things.

office

the top left photo is taken from my assistant's work space. the shelves over her desk hold embellishments of all sorts, my new thrifted canisters, and the marzipan inc. sign hangs to the right. the bottom left photo is from my desk. the photos are two of mine from my photo of the day study turned fresh snapped photos. the tin box holds greeting cards from other stationery designers that i use for very special occasions only. the vintage radio was my great grandmother's, which is topped by a couple journals. the right photo is what sits to my right side on my desk. lots of drawers from ikea keep everything organized. they're topped with personal mementos like a family snapshot, a photo of my hubby from way back when, my lucky buddha, and a sketch i did in high school. (just to remind me where i came from)

information center

this "information center" has been in my head for awhile and i finally executed it before the open house. the big white board will help organize orders, to-do's, etc., the white pen/misc holders are also from ikea. to the right is a long white shutter which i've put some of my favorite stationery designer's work. the clipboards are for keeping current project organized and at our fingertips. of course, with kids, they need a place to occupy themselves while i work. below the information center is their little table and some of their current artwork. the photo on the right is a mobile clip thingy where i put some of the designs i'm currently working on. we have 2 in the office which always contain our most recent designs.

inventory room

last but not least is our inventory room. it basically speaks for itself. it's where we keep all of our unembellished, unpackaged cards waiting to be done. yes, i have a ton of rubbermaid drawers. it's the first thing people comment on when entering this room. they always comment about how organized i am, but really i'm not quite sure how else i would do it. i lived with boxes piled on top of each other for quite some time and there's just no way at this point in the game that i could manage that.

we also have a few other rooms in the studio that i didn't photograph because of boringness....our supply room which contains all the envelopes, embellishments, adhesives, papers, etc., and our shipping area. they're just not that interesting. maybe someday i'll do something to make those more fun as well. until then, i hope this satisfies all your curiosities about where i work!

Monday, September 21, 2009

the unveiling

sorry it's taken so long, but i finally got around to downloading, editing, and uploading all the remodel photos for everyone to see!

kitchen

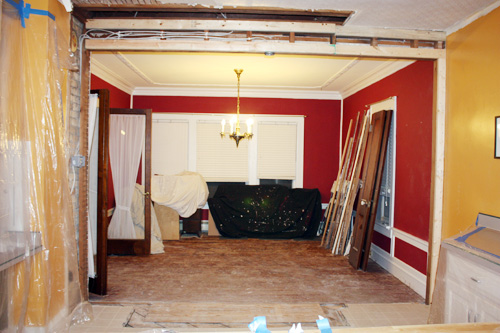
the first step: removing the wall between the kitchen and dining room. this is the view from what used to be the dining room into the kitchen during wall removal.

dining

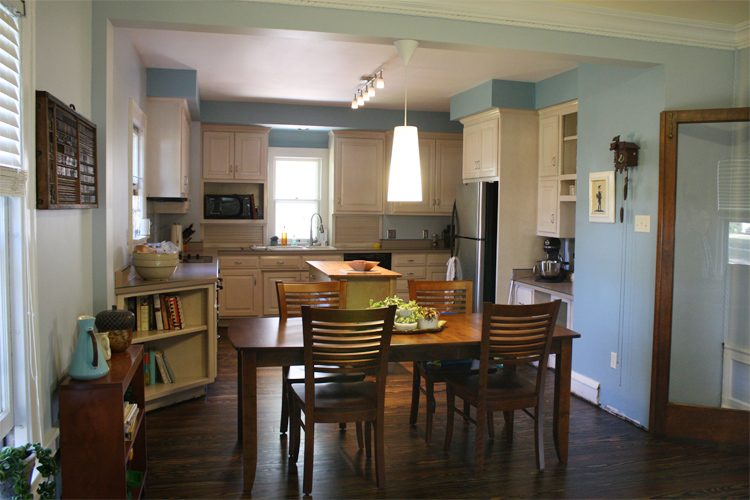
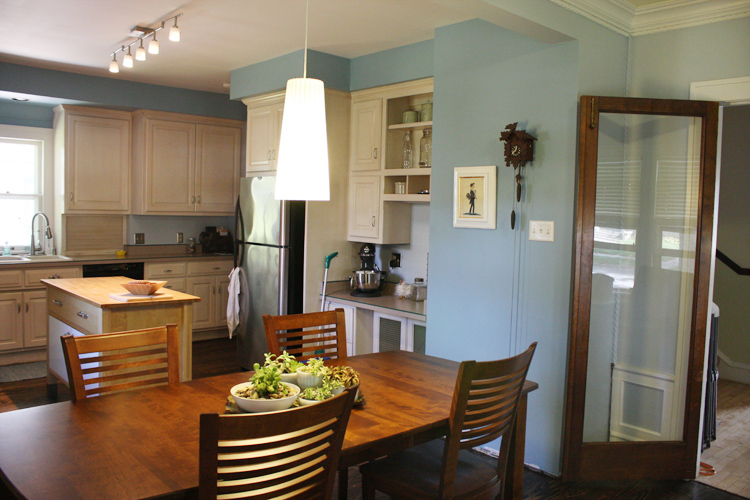
and here we are looking from the kitchen into the dining room. after the wall was removed and the drywall mudded and sanded i painted both rooms the same color to unite them. we used a darker shade on one small wall (the one where you see the cuckoo clock) and the area above the cabinets. we had already removed all the flooring in the dining room when we had the other floors refinished earlier this summer but the kitchen floors still needed removal.

floor removal

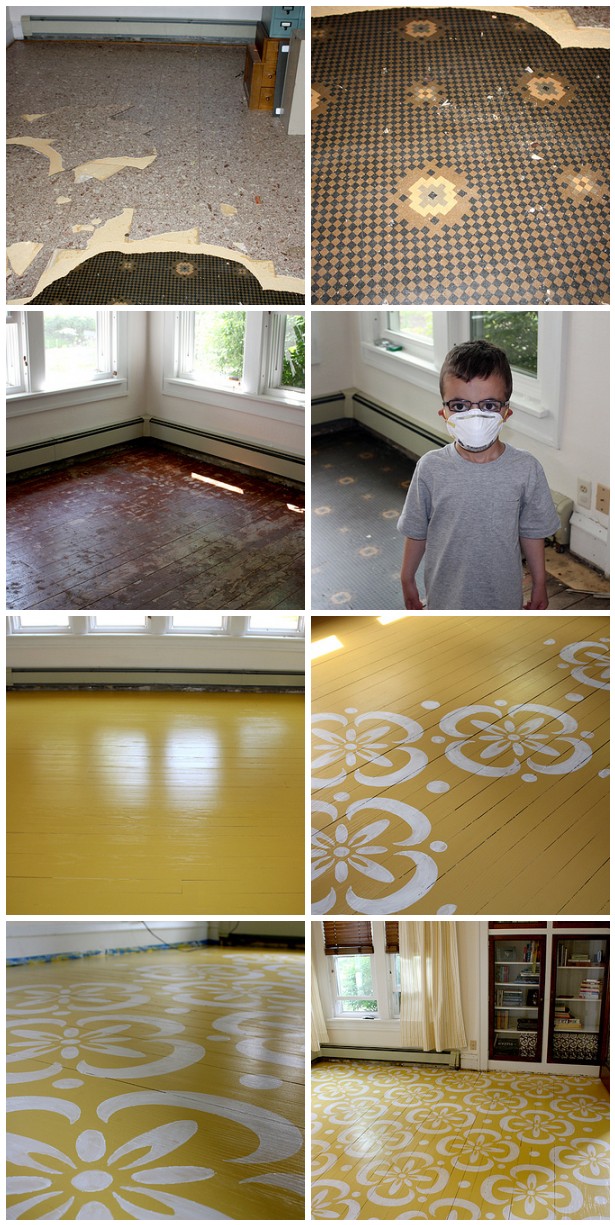
and here's the removal of the first of 4 layers of flooring in the kitchen. underneath our plain cream vinyl was a very cool and graphic old pattern. i only wish it was in better shape, i would have kept it!

floor removal
and another layer.....

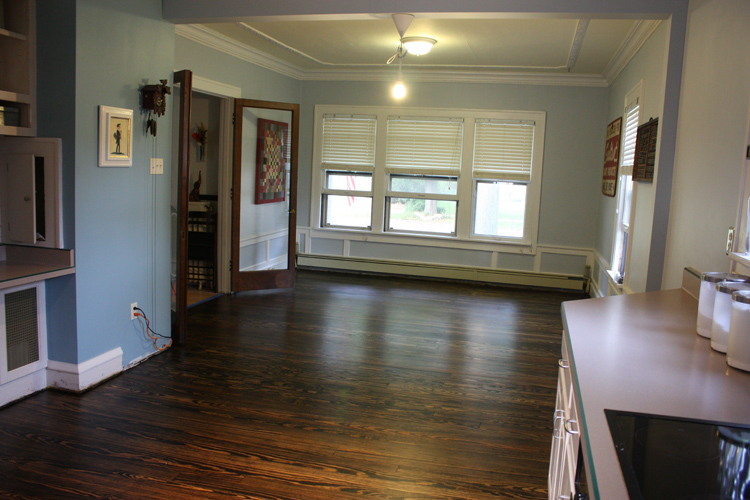
after the floors were sanded i stained them a dark brown and the floor people came back to seal it. here are a few photos of the final floor before we moved anything back in.

kitchen :: floors refinished

kitchen :: floors refinished

kitchen :: floors refinished

and here are a few with everything moved back in:

kitchen :: after

kitchen :: after

kitchen :: after

there's still a lot of work to do, like finishing & painting trim, but i think we're going to take a little break and do that as we get around to it. it's been a busy summer and we're ready for a little breather!

if you want to see the whole set of photos you can see them on my flickr house set.

Thursday, September 10, 2009

sneak peek :: refinishing old wood floors

othernews

floorpeek

a little sneak peek of a small portion of the project we're working on. the refinishing of our old wood floors on the second half of our first floor. i spent yesterday afternoon on my hands and knees staining the floors after the sanding guys left. they're coming back later today to seal them, and then once again tomorrow. final before & after photos to follow soon!

you can see the first part of the project here which was done earlier this summer. once this half is done, we're done with big projects for awhile!

Saturday, August 08, 2009

busy, please stand by

othernews

remodel

we're in the midst of a small-ish remodeling project and i need to take a few days off from my photo of the day. this is the first i'll be missing in nearly a year and it feels sort of strange. i just need some time to focus on getting this job done in time for the baby's birthday party in a few weeks! photos of the day may be sparse for the next week or so. i'll do my best! i leave you with a very small sneak peek of the project!

Thursday, July 09, 2009

design*sponge feature

othernews


sunroom_final

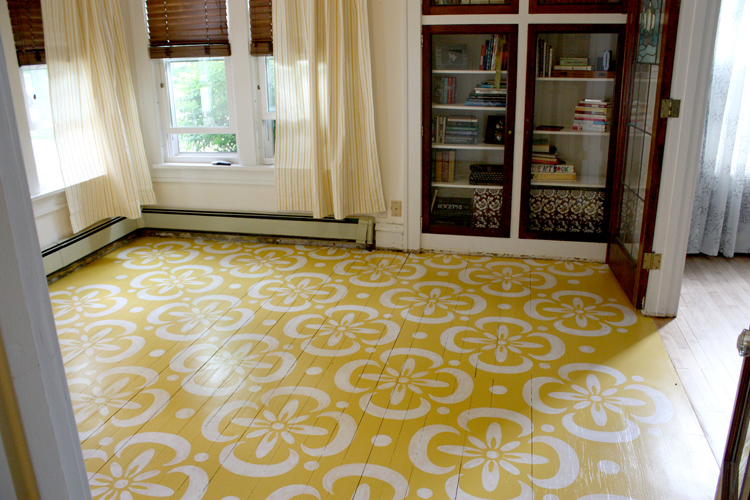
welcome, design*sponge readers! thanks for stopping by! we're glad you liked our painted floors featured today. you can view my original post about them or a how-to follow-up i did on the process i used.

i hope you stick around awhile. we have lots of great stuff to see including a photo of the day as well as almost-daily features showcasing everything from family life to business news, and even photos of some fun things i find while thrifting!

Tuesday, June 30, 2009

renovation :: part 2

othernews

since posting about our floor renovations, i've had some questions as to how exactly i painted the floor. i'm going to lay out as best i can the steps i took. keep in mind, i'm not a professional and there may be better ways. this is just how i did it.

sunroom_pattern

above is a photo of the pattern i cut out of foam core (which i'll talk about it more detail below). i think it's beautiful just on it's own. unfortunately it doesn't exist anymore which is why i took the photo. as i got to the edges of the room i had to keep cutting it down until there was nothing left. sad, sad, story.

how to: (prepping the floor)
  1. start with a freshly sanded or smooth floor. when the refinishers sanded the maple floors, we had them do this room as well so i had a fresh palette to work with. 
  2. i applied a single coat of primer to the floor to start. it wasn't a very thick coat, you could still see the grain of the wood through it. 
  3. i applied 3 coats of the base coat color. i used glossy finish porch paint because i wanted it to be easily cleanable since it's a high traffic area. (fyi, home depot is discontinuing this paint and is only going to be offering matte finish....bummer.) 
how to: (creating the stencil)
  1. to create the stencil, i found a pattern i liked. i then recreated the pattern in illustrator and made adjustments. (ie. i made the center flower larger, took out some small line details, spaced the flowers out more etc.) if you don't have a program like illustrator, you could do this with graph paper, or something similar to ensure your pattern is perfectly symmetrical etc. (or you could ask a good friend that has access to such a program) ;) 
  2. i scaled the pattern to the exact size i wanted it to be on our floor. make sure you have something in your design that you can use to line them up to create the pattern on your floor. for me, i could line up the dots from the previous flower to know exactly where the next one went. 
  3. i then printed it out at full size. (most programs offer the tiling function so it will print the design on multiple pieces of paper that you can then tape together) 
  4. i purchased the largest size of foam core from hobby lobby and taped the printout to it. 
  5. using an hobby knife, i carefully cut out the pattern. this is not easy, especially with a rounded design such as mine was. it would be much more simple with a straight-lined design. i chose foam core since it was a big project and i wanted something that would hold up to multiple uses. i was afraid matte board or the like would end up getting soggy. 
how to: (painting with your stencil)
  1. i measured my room to find the exact center and started there. depending on your design, this may or may not be the way you want to do it. for me, i wanted the design to run off the edges of the room from left to right, but then end short front to back, so this step was important.
  2. using a small artist brush i started painting in the stencil. again, i used glossy porch paint in white. for mine, it would definitely take 2 coats to get a solid color, however, we stopped at 1 because it was the look we were going for. 
  3. after each flower, i would line the stencil up to determine where the next one went. having a floor with lines also helped ensure that i kept my stencil straight. if you did this without something that was lined, you might need to lay down a starting line to make sure your first one is straight. after that, if you line everything up they should continue being straight. 
that's basically it! one tip i would suggest: if you use foam core, coat the cut edges with a couple coats of paint. i found that once it got coated with paint,  it smoothed out and took care of any little imperfections there were in my cutting. 

i hope that answers everything. if not, feel free to leave a comment. i'm happy to answer any questions! if you paint something, be sure to send me a link to some photos! i'd love to see! 

Monday, June 29, 2009

renovation :: part 1

othernews

not long ago i mentioned that i needed some help with some flooring ideas. well, the project is now complete! we've been ripping out carpet and other random floor coverings for the last couple months. last monday the floor guys came out to start work on the refinishing of our wood floors. here are some before and after shots! 

frontentry
this is our front entry with the staircase leading to our second floor. the top two are the before pictures with the carpet still intact. the second two are what the maple floors looked like under the carpet, and the last two are what they looked like after being refinished.

livingroom
here are the same photos for our living room. please pardon the messy before photos. we were trying to get ready to rip out the carpet and stuff was everywhere! i only have one (viewable) photo of what the wood floors looked like under the carpet. then, the final product. it's so amazing what a huge floor sander and a little poly can do! i can't wait to move our stuff back in! (which will be happening slowly over the next couple weeks. i want to do a little rearranging, decorating since the rooms are all empty.)

sunroom
and here's the room i was asking for help with. it's our sunroom. because it only had soft wood, and not maple like the other areas, i thought it would be the perfect opportunity to try some paint! i had always wanted to paint a wood floor, and here was my chance. i posted a pattern i liked here. while i really liked the pattern, there was just something i wasn't sold on. i couldn't put my finger on it. then, one day while searching flickr for some more painted wood floor inspiration, i came across a photo which had rough old worn wood floors with HUGE patterns spread out over it. we're talking like 4 feet in diameter each! there was my answer. while our room isn't big enough to support 4 foot designs, i blew the pattern up to about 24" in diameter each. i laid it all out in illustrator to see how it looked and the floor was born! it took me the weekend to do the pattern, but we're both really happy with it. we chose to only do one coat on the white so that it was a little more "rustic" (for lack of a better word). we're going to leave it unfinished for awhile so it can get some good old wear and tear on the patterns and then when it's worn to a point we like, we're going to seal it. i should mention that including the felt paper that had to be scraped off the floor, there were 5 layers of flooring in this sunroom! oy!

now that we're done with that we're going to be moving onto the other side of our first floor which includes the dining room (soon to be family room), kitchen, and back hallway. exciting times!

Saturday, June 13, 2009

send me some inspiration

othernews

painted floor pattern

i need help.....fast! we've torn out all the carpet in the first level of our house. we have nice maple hardwood floors in the livingroom and entryway/foyer areas. in the sunroom and the dining room (soon to be family room) we have a soft wood. probably something like fir. when they guys come to refinish the maple floors, they're also going to be sanding the soft wood floors for us as well. i'm hoping to paint both the sunroom and dining room since the wood isn't the greatest quality. the problem? they're coming in a week and i don't have a plan yet! i'm not sure if i want to go solid or patterned, one of each, both......i don't know! i've done a quick online search and didn't come across anything too inspiring except for the image above. i really love this pattern and think it would be great in our sunroom. i'm thinking yellow for the background and white for the pattern. anyone have any great ideas, patterns, etc? i'm open to hearing all of your ideas! even if you think they're crazy! i'm pretty crazy when it comes to stuff like this and don't mind doing project that are detailed. if i go solid color, any suggestions on a good color? both of these rooms are not decorated yet, so i'm pretty open. i'd like to eventually paint the new dining room turned family room walls a light blue grey. other than that, i'm open!

*image from ohdeedoh

Thursday, March 26, 2009

wire baskets


check out these 2 great wire baskets i scored last weekend when thrifting! they need a little clean-up, but they're super great! they measure about 1" x 1.5". the best part? i scored them for .75 each! not sure where i'm going to use them exactly, but i was thinking of using them in our newly remodeled bathroom. i've been looking for something like this for our vanity area!

Tuesday, March 24, 2009

studio paint


when we moved into my new studio space 3 or so years ago, i painted it before we moved anything in so that it would be a smooth transition and i could unpack everything right away. well, i've hated the paint color since the day i put it up. however, since i was moving an entire u-haul truck of stuff in the next day, there was no time to repaint. so here we are 3 years later with the same horrid color on the wall.

above are some new options and i'd love your opinions. the brown color is on some trim in the room, so really not a lot. the raspberry color is on one small wall in the office. both of these colors are ones i chose, and ones i'd like to keep. the new color i'm choosing to replace will go on the other 3 walls of the office. since the raspberry color is on the dark end of the spectrum, i would like something rather light on the other walls. the fist option is a light yellow. i though this would be nice since my studio has essentially no windows. the second is actually just a lighter version of the blue in my logo, and the third is a nice neutral grey. what do you think? which would you choose?

Monday, February 23, 2009

artist


the little dude is turning into quite the little artist these days. usually he draws things like people or just scribbles on the paper for fun. this is the first time that he sat down and actually tried to draw something that was in front of him. we were in the other room and when we came back to check on him he said "look, i drew this ship!". we were both pretty surprised when we could actually see the resemblance.

orla


i hadn't had a chance to get to target since orla's products were released. from what i had been reading all over the blogosphere, my chances of finding anything was pretty slim if i didn't get there right away. plus, being in a small town, i figured our store wouldn't have much of a selection. we ended up making a trip this past sunday and low and behold, a whole end cap of orla! i know i complain about living in a small town and not having anywhere to shop etc. now i've finally found a benefit! since i'm pretty much the only person in this town who even knows who orla is, i had plenty to choose from! they didn't have everything from her line, but they had a good selection. of course i had the hardest time choosing. i really wanted her canisters, but we already have new ones for the kitchen and i didn't know what i'd use them for. i settled for a grey pear mug and two of square bowls in brown and orange. if anyone out there wants anything and can't get it, let me know! i'd be happy to pick some up and ship it!

Sunday, February 22, 2009

fort weekend


this weekend the hubby built a fort for the little dude in his bedroom by taking his comforter and connecting it from the bed to his bookshelves. i cannot tell you how cool the little dude thought this was. here he is after waking up from his nap (sans glasses) which, of course, had to be taken in his fort and not his bed. i figured there would be no napping actually taking place, but surprisingly he took quite a good little nap under there!


these are all the essentials for napping in the fort: pile of books. check. tons of stuffed friends. check. blankets. check. pillows. check.


and here's a photo of what the fort looked like from the outside.

Thursday, February 12, 2009

zip it!

over the weekend the hubby was reworking some of our electronics and had a little bag of zip ties that he was using to wrap up the cords. the boys got hold of the bag and took them to the neighboring room. this is what i found when i looked over:


they were taking each one and sticking it down into the carpet so that they stood up! such creative little guys!


the baby grabbing his handful.


i love that they look like a little forest of skinny trees.

Blog Widget by LinkWithin