not long ago i mentioned that i needed some help with some flooring ideas. well, the project is now complete! we've been ripping out carpet and other random floor coverings for the last couple months. last monday the floor guys came out to start work on the refinishing of our wood floors. here are some before and after shots!
this is our front entry with the staircase leading to our second floor. the top two are the before pictures with the carpet still intact. the second two are what the maple floors looked like under the carpet, and the last two are what they looked like after being refinished.
here are the same photos for our living room. please pardon the messy before photos. we were trying to get ready to rip out the carpet and stuff was everywhere! i only have one (viewable) photo of what the wood floors looked like under the carpet. then, the final product. it's so amazing what a huge floor sander and a little poly can do! i can't wait to move our stuff back in! (which will be happening slowly over the next couple weeks. i want to do a little rearranging, decorating since the rooms are all empty.)
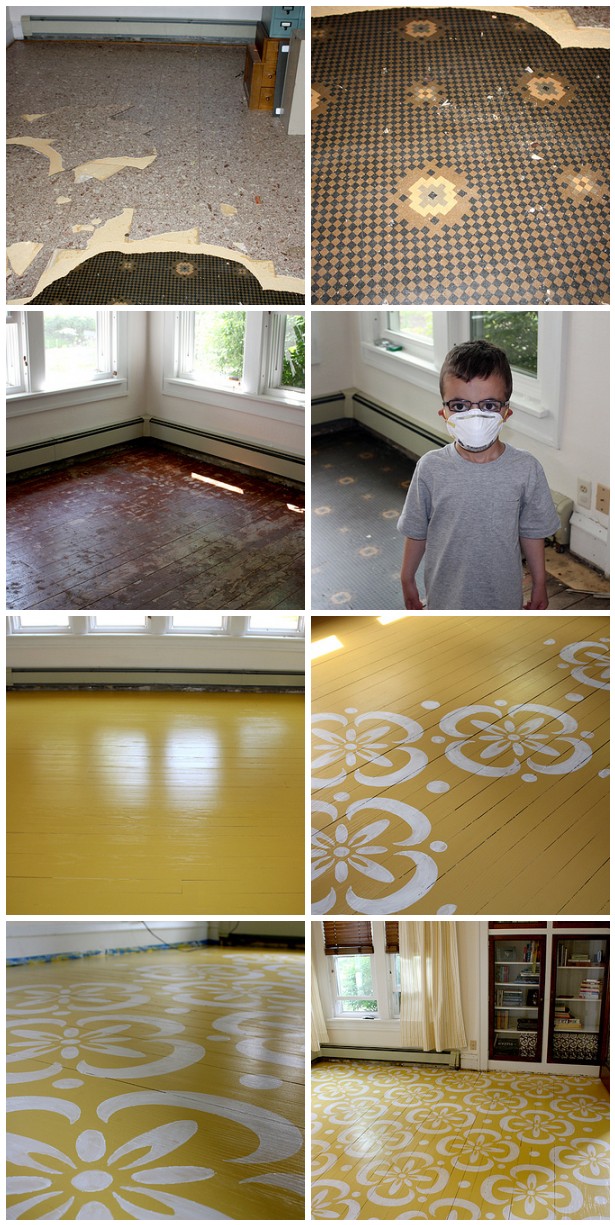
and here's the room i was asking for help with. it's our sunroom. because it only had soft wood, and not maple like the other areas, i thought it would be the perfect opportunity to try some paint! i had always wanted to paint a wood floor, and here was my chance. i posted a pattern i liked here. while i really liked the pattern, there was just something i wasn't sold on. i couldn't put my finger on it. then, one day while searching flickr for some more painted wood floor inspiration, i came across a photo which had rough old worn wood floors with HUGE patterns spread out over it. we're talking like 4 feet in diameter each! there was my answer. while our room isn't big enough to support 4 foot designs, i blew the pattern up to about 24" in diameter each. i laid it all out in illustrator to see how it looked and the floor was born! it took me the weekend to do the pattern, but we're both really happy with it. we chose to only do one coat on the white so that it was a little more "rustic" (for lack of a better word). we're going to leave it unfinished for awhile so it can get some good old wear and tear on the patterns and then when it's worn to a point we like, we're going to seal it. i should mention that including the felt paper that had to be scraped off the floor, there were 5 layers of flooring in this sunroom! oy!
now that we're done with that we're going to be moving onto the other side of our first floor which includes the dining room (soon to be family room), kitchen, and back hallway. exciting times!


36 comments:
Oh my goodness!! Everything looks amazing! That painted floor is to die for. Awesome!!
OK seriously that painted floor is AMAZING! It's like something out of Better Homes & Gardens. They have a back page feature where people submit home projects they have done, you should totally submit that. I'm super impressed! :)
I cann't wait to see this. This is the kind of home improvement I am all over: someone else's beautifully finished work ;)
Sheesh! I love this, Lori! =D It turned out so well!
And how did you make the stencil (if you don't mind me asking).
love, love, love your painted floor! gorgeous, Lori!
Absolutely love your painted floor - good job - you are a woman of many talents!
wow!! that looks so pretty. can you please come help me at my house :) ??
Wow Lori! What a huge difference you've made in your house just by changing up the flooring. Looks fantastic!
Yowza, Lori! I'm so behind on my blog reading these days, but I saw your project when it popped up on design*sponge (congrats)! So cool.
Going in my inspiration folder — great choices!
I have seen pics of your flooring ALL over pinterest but it took me forever to find the original source! I'll be featuring your floors on decorate.tipjunkie.com! They are fabulous!
The difference can be seen for sure. It can take awhile to accomplish the task but for sure, in the end, it can be very rewarding. Being in a flooring Houston company, I am glad to see DIY projects that are successfully done!
Five layers of flooring?! Yikes, I thought I had it rough with 3 layers... which I have yet to start taking up. But thanks for the inspiration! I too have soft wood floors throughout my livingroom and I think the stencil idea is great! Thanks for posting all your hard work!
The flowery paint patterns with a bright yellow color with it gave the room a brighter feel best for people who want to have brighter mornings. Some people really have the problem of coming up with a good set of pattern, and yet you have provided us a better idea as on how to get one of our taste. Thank you so much for the fun inspiration!
I really love the new floorings you have. Carpets are just so difficult to maintain and are not so good when children are around because studies have shown that poorly maintained carpets may lead to development of asthma and other allergic conditions. The stencilled floor is also beautiful. It certainly is fit for a sun room. Great job!
It's a lovely job, but the design is a copyright to Stencil Library in the UK and I suggest that if anyone else wants this design they should buy the stencil from there rather than using a copyright stencil as they could be sued.
that floor really looks great! i am thinking about painting my bedroom floor but i'm worried about the paint since the floor is varnished wood. Will it be a problem?
I've just decided to create a blog, which I have been wanting to do for a while. Thanks for this post, it's really useful! Hardwood Flooring Orange County
I am searching for that yellow and white pattern. Can you send me the link? Thanks
Suzy_pal2000@yahoo.com
Would you be willing to put a link to the image you used?
Valuable information,Thanks a lot for sharing them with us.
Oh wow. That look totally good.
Très intéressant! Pourquoi ne pas s'intéresser aux finances personnelles?
I am really glad to visit your blog. I check your blog regular and attempt to take in something from your blog. Much obliged to you and sitting tight for your new post.
House Renovations in Elephant
Very informative and useful historical post. I see you have a lot of other cool stuff available at your website, simply bookmarking it to check in spare time. Thanks and keep the good work up.
House Renovations in Kingston
Wow, looks great! Great job!
kamień dekoracyjny na ścianę
What color yellow paint did you use? I love it!!
Good This is very unique informative and beautiful article. I like it very much thanks
Waterproof Tarpaulin
Thanks for sharing these ideas about using marble in interior design.
home renovation Ireland
kitchen renovation Dublin
bathroom renovation contractors Ireland
house renovation services
renovation ideas for Irish homes
eco-friendly renovation Ireland
old house renovation Dublin
renovation cost estimator Ireland
modern home renovation trends
renovation contractors near me Ireland
Good post — especially about budgeting and timelines. People don’t always realise how important the planning stage is.
House Refurbishment Company
Ready to assemble modern white kitchen cabinets make installation affordable and convenient for homeowners.
Thanks for sharing these ideas about using marble in interior design. home renovation Switzerland
kitchen renovation Zurich
luxury villa renovation
bathroom remodeling Geneva
Swiss renovation experts
energy-efficient renovatio
This platform connects users with trusted remodeling-near-me services for all types of home upgrades.
Its organized structure helps improve local visibility in search results.
Ideal for anyone looking to remodel their space with reliable professionals.
Excellent remodeling services Great attention to detail, professional craftsmanship, and a beautiful finish every time
What an incredible transformation—from carpet to beautifully refinished maple floors, and that painted-pattern sunroom is simply artistic. It’s amazing what a good floor sander and a bit of creativity can achieve. For projects that demand that same level of finish and craftsmanship, VDF Flooring Contractors in Hyderabad offer durability and style that elevate both homes and commercial spaces.
Nice blog; great information you have shared. This was very helpful for those who are looking to renovate it. If excellent-quality stuff limestone flooring tiles for a floor or driveway are needed, keep in touch.
Post a Comment